I'm curious to know how people have been dealing with badly smeared images to reduce or eliminate the smear. I'm making 20000x10000 pixel global maps of Ganymede and Callisto. Lots of the highest resolution Voyager 1 images are badly smeared but I really want to use them in the maps if possible - and use them without smear (otherwise the maps get too ugly). I've been experimenting with the Smart Sharpen filter in Photoshop. I'm rather happy with the results I've had but before I start reprojecting these images and adding them to the maps I'm curious to know if anyone knows of something even better.
Here are two examples from Voyager 1 where I attempted to desmear smeared images using the PS Smart Sharpen filter. The original is shown together with a desmeared image. One is from a moderately smeared partial image of Callisto and another one is a badly smeared image of Ganymede. As indicated above I'm rather happy with the results but if something better is possible I'd like to know.
Callisto:
Click to view attachment
Click to view attachment
Ganymede:
Click to view attachment
Click to view attachment
Full Version: Desmearing Voyager images (and other images)
There are some programs specially designed to do that. I heard about Topaz InFocus or Huygens. Both aren't free and I haven't them so I'm not sure about quality (but Huygens has some good references in scientific literature).
Topaz and others are using blind deconvolution. Only freeware with this function is Image Analyzer by the Michael Vinther.
Unfortunately it doesn't work with images with more than 8 bits per channel which limits its capabilities.
Problem with blind deconvolution is that it very often fails in case of images with complex blur.
But there is the hard way of classic deconvolution with known PSF (point spread function).
If you don't know PSF, you can try to deduce it. Small bright craters are good guideline or you can even try them as PSF.
This is quick result of Wiener deconvolution with your blurred image of Ganymede.
(It's made in the "Swiss knife" of the image processing - ImageJ).
Thanks for highly useful information - this quick result is much better than what I achieved using Photoshop (it's possible to get slightly better results there than what I posted above but not nearly as good as the ImageJ result).
I now have ImageJ and the "FFTJ and DeconvolutionJ" plugin - is that what you used? If so what does the image you used for the PSF look like? I have experimented a bit but the results are bad (it would be interesting to see the PSF image here).
But I'm now very optimistic that I'll eventually be able to desmear and use all of the smeared images that are interesting.
I'm using mostly Parallel Iterative Deconvolution plugin made by Piotr Wendykier (method WPL- Wiener Filter Preconditioned Landweber).
Here is PSF which I used for the Ganymede image. It was quick derivation from one of the small bright craters with some fiddling with brightness and eraser
(so results could be even better with more effort).
Here is PSF which I used for the Ganymede image. It was quick derivation from one of the small bright craters with some fiddling with brightness and eraser
(so results could be even better with more effort).
Wow, thats great and very simple Machi. I've had some good luck with the tools from AstraImage (also not free) and Focus Magic (not free) but they don't allow you to input a PSF as an image. I've done the similar PSF input method with MaximDL in the past but never got results this good. This is both free and produces pretty good results. Thanks for the tip!
Fourier processing gives also not bad results. It allows to slightly increase resolution (about x2).
http://i0.simplest-image-hosting.net/pictu...es-proc-avg.png
Because it doesn't use deconvolution it can be useful when the kernel is unknown or varying.
(updated)
http://i0.simplest-image-hosting.net/pictu...es-proc-avg.png
Because it doesn't use deconvolution it can be useful when the kernel is unknown or varying.
(updated)
isis3 dstripe dose a decent job
a Fourier dose a good job on sharpening but there is a SMEAR -- camera motion
c1640216.imq
voy2isis > spiceinit > voycal > findrx( null) > lowpass( on NULL) > dstripe ( 1,73/73,1)
before dstripe and after

you can use the arrows on imagebox to flip between the two ( upper right of the image)
a Fourier dose a good job on sharpening but there is a SMEAR -- camera motion
c1640216.imq
voy2isis > spiceinit > voycal > findrx( null) > lowpass( on NULL) > dstripe ( 1,73/73,1)
before dstripe and after
you can use the arrows on imagebox to flip between the two ( upper right of the image)
The Parallel Iterative Deconvolution plugin mentioned above is awesome. I have been able to get similar results to machi's results above for images that had a similar 'type' of smear (it was slightly less in my case). Comparing the results to other images that are not smeared and were obtained at a similar time with a different filter reveals that the smeared images were almost completely restored.
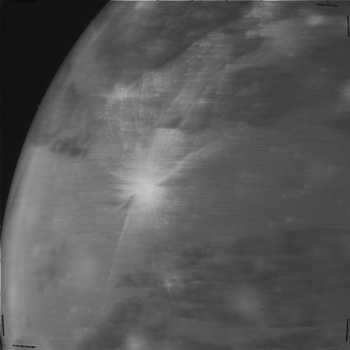
But interestingly, I've had some problems with images where the smear is much less. This image of Ganymede is an example:
Click to view attachment
I experimented with lots of PSF images but got the best results using this one:
Click to view attachment
But the resutling image isn't particularly good. There's less smear and some details are restored but there's also a lot of noise:
Click to view attachment
In a different thread, jccwrt has been experimenting with smeared images of Io using this same plugin. He ran into similar problems and wrote:
This could be my problem too. Another related possibility is that in some of the less smeared images (the ones that are difficult to desmear), the scan platform started moving just before the end of the exposure or stopped moving just after the start of the exposure and introduced 'vibrations' or other irregular motion while in the more smeared images the motion was even and regular throughout the exposure, with the regular motion making the images relatively easy to desmear.
Needless to say, if anyone is interested in trying to get better results and succeeds I'm interested in knowing about it.
But interestingly, I've had some problems with images where the smear is much less. This image of Ganymede is an example:
Click to view attachment
I experimented with lots of PSF images but got the best results using this one:
Click to view attachment
But the resutling image isn't particularly good. There's less smear and some details are restored but there's also a lot of noise:
Click to view attachment
In a different thread, jccwrt has been experimenting with smeared images of Io using this same plugin. He ran into similar problems and wrote:
QUOTE
The most severe smearing was in the first frame of each sequence, so I'm guessing that's a result of imaging before the scan platform had entirely stabilized after slewing.
This could be my problem too. Another related possibility is that in some of the less smeared images (the ones that are difficult to desmear), the scan platform started moving just before the end of the exposure or stopped moving just after the start of the exposure and introduced 'vibrations' or other irregular motion while in the more smeared images the motion was even and regular throughout the exposure, with the regular motion making the images relatively easy to desmear.
Needless to say, if anyone is interested in trying to get better results and succeeds I'm interested in knowing about it.
Looks like the main source of noise in your deblurred image is the vertical striping noise that's present in Voyager images. I did a quick deinterlacing filter to get rid of those and it helps reduce the noise a little bit. Probably a good idea to remove those before applying the deblurring process, since the noise is getting incorporated into real features.
Another thing I've found experimenting with this is decreasing the brightness and increasing the contrast of the psf a little bit helps. I assume this is because in reality most features that are bright enough to form streaks are large enough to contribute to adjacent pixels, so fiddling with brightness and contrast to make a smaller, less intense psf is compensating a little bit for that.
Finally, it looks like the filter isn't quite finishing the job with the default of 5 iterations, so I increased the maximum number of iterations to 10 and wrung a little more out of it.
Here's the modified psf I used:
Click to view attachment
And the resulting deblurred image:
Click to view attachment
It's a marginal improvement (some of the ghosting of prominent features is reduced, a little bit less marbling of the image) but that's about as much as I can think to do with it.
This is a "lo-fi" version of our main content. To view the full version with more information, formatting and images, please click here.