I for one look in wonderment at the work of Damia and others. Being a curious soul I also want to know how they do it and also have a go at colourising myself.
I have searched through Google trying to find tutorials on colourising but the results tend to be in the realms of changing red cars into green cars etc.
I have also searched for colour mapping, gradient mapping...the list goes on!
I have come to the conclusion that I don't know what I am talking about and therefore don't know what question to ask.
Could someone please point me in the direction of a good resource on colourising greyscale images using colours from another 'reference image'. (Is that the right question?)
I have Photoshop cs4, cs4 extended, cs5.1 and cs6.
All this software and no knowledge.....it's getting embarressing!!
Full Version: Using Photoshop to Colourise
Splitting a color image in hue/saturation/value channels, then combining the grey-scale image as value channel with the hue and saturation channel of the color image could be a starting point.
The image geometries should match.
The image geometries should match.
QUOTE (Gerald @ Mar 22 2014, 10:13 PM) 
Splitting a color image in hue/saturation/value channels, then combining the grey-scale image as value channel with the hue and saturation channel of the color image could be a starting point.
The image geometries should match.
The image geometries should match.
Gerald,
Thank you for your reply,
I recognise the words but the meaning evades me, as I said, I am a curious soul so I will now investigate a lot of drop down menus, and docked wotsits.
Thanks again.

Ok, I've had a play and a bit of Googling HSV (HSB?).
Swapping the greyscale for the value channel makes sense, however, how would I display an image in HSV (HSB?) mode.
I went down the usual Image..Mode.. route but no HSV option.
Sorry to come across as being a bit thick but I use Photoshop to wonderfully enhance my (not so wonderful) photographs, and this is not a route I would normally take.
Here are two quicky methods for dropping color from one image into another
One method is:
Align the two images as best you can
Put each image in a separate layer with the color image on top
Reduce the opacity of the color image to something very low, like 20%
Merge or flatten the layers
Increase the color saturation to a comfortable level
Adjust image levels/saturation/color-balance until the image looks good to you.
Another method:
Align the two images as best you can and place them in separate files
Copy the black and white image
Change the MODE of the color image to CMYK
Select "channels" under the "Window" drop down menu
In the "channels" box click on the "black" layer
Paste the copied black and white image into the "black" layer.
Select the CMYK layer
Adjust image levels/saturation/color balance until the image looks good to you.
Change the MODE back to RGB
One of my favorite image processing tricks: colorizing images
(I was curious, so I checked to see if Google was smart enough to return results featuring "colorizing" for a search on "colourise" -- it was but the search results are still quite different than for a search on "colorizing
  )
)
(I was curious, so I checked to see if Google was smart enough to return results featuring "colorizing" for a search on "colourise" -- it was
but the search results are still quite different than for a search on "colorizing )
Thanks all for the tips/links.
I'm going to have Sunday dinner and then have a good root around.
I will let you know how I got on and maybe even post an attempt of two for an expert critique (be gentle!).
I'm going to have Sunday dinner and then have a good root around.
I will let you know how I got on and maybe even post an attempt of two for an expert critique (be gentle!).
it really depends on what is being colorized
combining a set of 3 Red, Green, Blue images into a color image
( this has been done scene the mid 1800's )
for example this photo gallery from 1909 Czarest Russia
http://www.wired.com/rawfile/2014/03/proku...-photos-russia/
where a black and white images using a
1) red filter
2) green filter
3) blue filter
are combined into a single RGB image
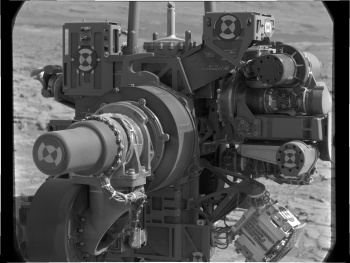
from a different post about the MSL
0229ML0010620000106079E01_DRCL.IMG
that is a rgb image but i can break it up for an example
-----red ------ green ---- blue


this is for Gimp 2.8.10
open all three red,green.and blue images
from the red click on
Color / Components / Compose
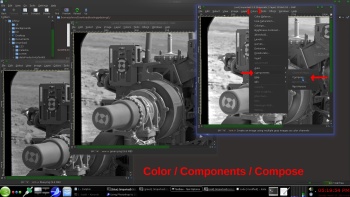
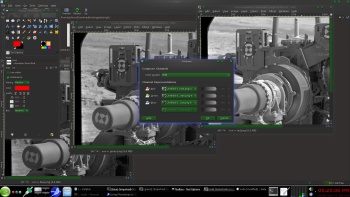
set the red layer as the red image
set the green layer as the green image
set the blue layer as the blue image
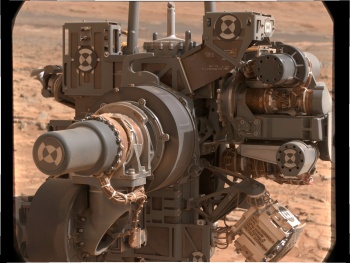
and you get this
The other type is ...
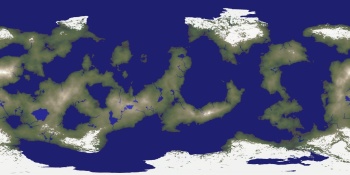
converting a black and white image that has NO!!!! color data
for example this fractal noise made Planet DEM
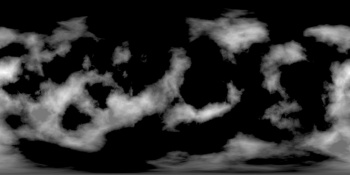
and colorizing it to this

this is more an ART FORM than a step by step
There is for a now gone tutorial ,still on the internet archive
http://web.archive.org/web/20130625110058/...=21&t=16089
combining a set of 3 Red, Green, Blue images into a color image
( this has been done scene the mid 1800's )
for example this photo gallery from 1909 Czarest Russia
http://www.wired.com/rawfile/2014/03/proku...-photos-russia/
where a black and white images using a
1) red filter
2) green filter
3) blue filter
are combined into a single RGB image
from a different post about the MSL
0229ML0010620000106079E01_DRCL.IMG
that is a rgb image but i can break it up for an example
-----red ------ green ---- blue
this is for Gimp 2.8.10
open all three red,green.and blue images
from the red click on
Color / Components / Compose
set the red layer as the red image
set the green layer as the green image
set the blue layer as the blue image
and you get this
The other type is ...
converting a black and white image that has NO!!!! color data
for example this fractal noise made Planet DEM
and colorizing it to this
this is more an ART FORM than a step by step
There is for a now gone tutorial ,still on the internet archive
http://web.archive.org/web/20130625110058/...=21&t=16089
JohnVV,
As you point out, combining three greyscale filter images has been around since Noah was a boy, I am familiar with this type of manipulation.
The second example is closer to the mark.
The way that I thought it all worked was to create a comprehensive colour gradient from a 'representative' colour image of a martian landscape and then map that to the 255 greyscale levels for any subsequent greyscale image of choice.
Obviously each resulting image would need tweaking, and the original colour gradient could be updated from other more 'representative' martian colour images.
This is how it works in my head, which is another universe entirely
The problem being I don't know how to do either.
the first example is a simple one
all 3 layers ARE from the SAME image
the photo gallery from 1909 used three photographic slides combined to make one image
A more complex one would be Bjorn's post
http://www.unmannedspaceflight.com/index.php?showtopic=7671
in synthetically making a red layer and a green and a blue
then alining up all three
in the"fractal noise" and "blue mars" examples above
that started with using a color image and making a custom "gradient" to use to add color
Gimp has a nice built in plugin to do this
( Photoshop ??? i do not use Microsoft software so i do not use photoshop )
and Gimp is GPL'ed
the "noise" one is a merger of 4 or 5 or 6 different images
different gradients and hand painting and working with many many many layers in the image
( and this was only a VERY quickly done image for a old post )
on the B&W image click on
Color / Map / Sample colorize

image layers are like a stack of slides
you stack them on top of each other
i will have to post links to tutorials
but they are going to be for DIFFERENT things
that all can be combined to do something else
unfortunately there really are no "step by step"
general guides to fallow yes , but no real
step1
step2
step3
different tutorials all doing something a bit different
the SAME theory applies to the very expensive Photoshop as to gimp
an example of using LAYERS , and a LOT of them
http://tutorialgeek.blogspot.com/2012/11/u...hotos-from.html
a basic one on the gimp web site
http://www.gimp.org/tutorials/Selective_Color/
painting
http://www.digitalphotoguide.net/post-prod...ite-photo-gimp/
the "sample colorize " plugin
http://docs.gimp.org/en/plug-in-sample-colorize.html
some youtube videos
https://www.youtube.com/results?search_quer...0white&sm=1
i learned using watercolor and paint brushes on B&W "rag" prints
-- photographic PAPER
digital is WAY EASIER !!!!!
reddit ???? but an example of what can be done
http://www.reddit.com/r/Colorization
all 3 layers ARE from the SAME image
the photo gallery from 1909 used three photographic slides combined to make one image
A more complex one would be Bjorn's post
http://www.unmannedspaceflight.com/index.php?showtopic=7671
in synthetically making a red layer and a green and a blue
then alining up all three
in the"fractal noise" and "blue mars" examples above
that started with using a color image and making a custom "gradient" to use to add color
Gimp has a nice built in plugin to do this
( Photoshop ??? i do not use Microsoft software so i do not use photoshop )
and Gimp is GPL'ed
the "noise" one is a merger of 4 or 5 or 6 different images
different gradients and hand painting and working with many many many layers in the image
( and this was only a VERY quickly done image for a old post )
on the B&W image click on
Color / Map / Sample colorize
image layers are like a stack of slides
you stack them on top of each other
i will have to post links to tutorials
but they are going to be for DIFFERENT things
that all can be combined to do something else
unfortunately there really are no "step by step"
general guides to fallow yes , but no real
step1
step2
step3
different tutorials all doing something a bit different
the SAME theory applies to the very expensive Photoshop as to gimp
an example of using LAYERS , and a LOT of them
http://tutorialgeek.blogspot.com/2012/11/u...hotos-from.html
a basic one on the gimp web site
http://www.gimp.org/tutorials/Selective_Color/
painting
http://www.digitalphotoguide.net/post-prod...ite-photo-gimp/
the "sample colorize " plugin
http://docs.gimp.org/en/plug-in-sample-colorize.html
some youtube videos
https://www.youtube.com/results?search_quer...0white&sm=1
i learned using watercolor and paint brushes on B&W "rag" prints
-- photographic PAPER
digital is WAY EASIER !!!!!
reddit ???? but an example of what can be done
http://www.reddit.com/r/Colorization
An impressive response from an obviously passionate expert. Thank you.
QUOTE
from an obviously passionate expert. Thank you.
about two years back i "tried" and failed to teach someone that DID NOT want to do any work and learn something
all that person wanted was
step1
step2
and so on
as a result i kept failing that persons software ad-ons do to very poor quality
( they were not passing a basic quality control screening )
if someone dose NOT want to put in the time to learn a new skill then .............
The colourising of an old black and white image to make it look as though it were a colour image is an artistic labour of love.
I am not a lover of labour, neither am I an artist. My eldest twin daughter however, is a bit of a budding artist, so I will show her this thread, I think she will love it.(It might even get her away from social media for a while!)
A step by step tutorial is an abhorrant idea, a general methodology which I can adapt is what is required, I think I need to go down the custom gradient route.?
Thanks again for all comments.
This is a "lo-fi" version of our main content. To view the full version with more information, formatting and images, please click here.